How to Configure SCIM IdP Integration (Microsoft Entra Connect)

[Reduce ID Management Effort by Integrating Entra ID with TrustLogin]


"SCIM IdP Integration" is a feature that synchronizes identity information using the SCIM protocol.
This article explains how to configure SCIM IdP Integration to connect with Microsoft Entra ID.
Note: This feature allows customers using Microsoft Entra Connect to synchronize users from Microsoft Entra ID
to TrustLogin.
Note: To use this feature, you need to subscribe to the TrustLogin Pro Plan or the corresponding option. For pricing, click here

TrustLogin Configuration

  1. Log in to TrustLogin, open the "Admin Page > Settings > Optional Features" menu, and open "Settings" to the right of "SCIM IdP Integration."
    image01.png

  2. Open "Add SCIM Source Configuration."
    image02.png

  3. Enter any name you like and click "Register."
    image3.png

  4. Open the source configuration you just created.
    image4.png

  5. Make a note of the values obtained from the "SCIM Endpoint" and "Generate Credentials" fields.
    (These will be used when configuring Entra ID.)
    Note: If you generate new credentials, the existing credentials will no longer be usable.
    image5.png

Azure AD Configuration

Configuring "Enterprise Applications"

  1. Open "Enterprise applications" from the Entra ID admin center.
    The Entra ID admin center can be accessed here.


  2. Select "New application."


  3. Select "Create your own application."


  4. Enter any name you like and click "Create."


  5. Open the "Provisioning" screen and click "New configuration" or "Get started."


  6. Enter the "SCIM configuration endpoint" obtained in step 5 of the TrustLogin configuration into "Tenant URL," and enter the value obtained from "Generate Credentials" into "Secret Token."


  7. Click "Test Connection" and confirm that the connection test completes successfully. Once confirmed, click "Create."


  8. In the mapping section, select "Provision Microsoft Entra ID Users."


  9. Select "Add New Mapping."


  10. Add companyName to the attribute mapping. Set "Source attribute" to "companyName"
    and "Target attribute" to "
    urn:ietf:params:scim:schemas:extension:enterprise:2.0:User:organization," then click OK.


  11. Add immutableid to the attribute mapping.
    Select "Add New Mapping" again, set "Source attribute" to "immutableId,"
    and "Target attribute" to "emails[type eq "other"].value," then click "OK."

  12. Save the settings.


    [Note] The attribute values imported from Entra ID to TL are as follows:

    AzureAD AzureAD Attribute AzureAD customappsso Attribute TrustLogin
    Username/Email userPrincipalName userName Email Address
    Display Name displayName displayName -
    Job Title jobTitle title -
    First Name givenName name.givenName First Name
    Last Name surname name.familyName Last Name
    Street Address streetAddress addresses[type eq "work"].streetAddress Street Address
    City city addresses[type eq "work"].locality City
    State/Prefecture state addresses[type eq "work"].region State/Prefecture
    Postal Code postalCode addresses[type eq "work"].postalCode Postal Code
    Country/Region country addresses[type eq "work"].country -
    Company Phone telephoneNumber phoneNumbers[type eq "work"].value Phone Number
    Mobile Phone mobile phoneNumbers[type eq "mobile"].value -
    Fax Number facsimileTelephoneNumber phoneNumbers[type eq "fax"].value -
    Company companyName urn:ietf:params:scim:schemas:extension:enterprise:2.0:User:organization Company Name
    Department department urn:ietf:params:scim:schemas:extension:enterprise:2.0:User:department Department

    immutableID

    Hidden in UI

    immutableId emails[type eq "other"].value Custom attribute: immutableID

    Email

    mail
    emails[type eq "work"].value
    Secondary Email Address
    External ID objectId
    externalId
    -
  13. Open the "Provisioning" settings.


  14. In the mapping section, select "Provision Microsoft Entra ID Groups."


  15. Change the "Enabled" setting to "No" and save.


  16. Open the "Provisioning" settings.


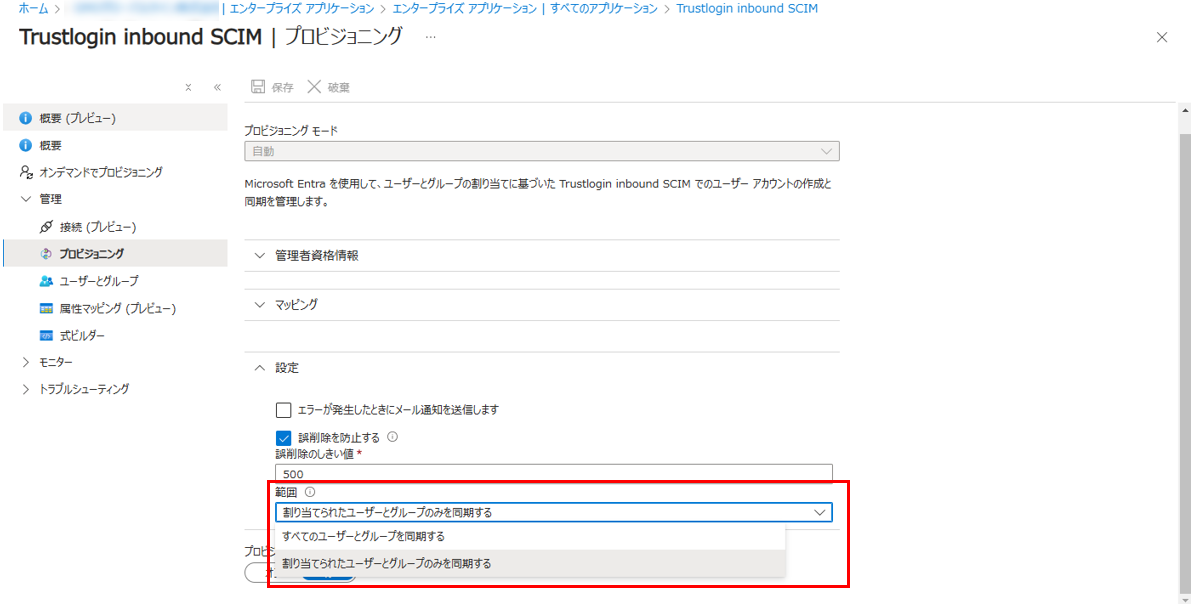
Change the "Scope" under "Settings" to match the scope you want to synchronize.
If you want to synchronize only specific users or groups, select "Sync only assigned users and groups."
If you want to synchronize all users under Entra ID, select "Sync all users and groups."


Configuring "User Provisioning"

  1. Provision users.
    Open "Users and groups" and select "Add user/group."


  2. Select "None Selected" and choose the users you want to synchronize (or the group to which those users belong).


  3. Click "Assign."


  4. Open "Provisioning" and click "Start provisioning" to begin synchronization with TrustLogin.

    A message indicating that provisioning has started will be displayed.


  5. You can check the results of user provisioning from the "Provisioning logs." Users for whom the "Create" action shows "Success" in the log will be created in TrustLogin.


  6. The configuration is now complete.
    Because the management of TrustLogin members created through Entra ID SCIM Integration depends on Entra ID, the following member operations cannot be performed on the TrustLogin side:

    - Profile changes
    - Member status changes
    - Member deletion
    mceclip1.png

Currently, only users are provisioned; groups are not provisioned. For information about group assignment, see the "Register a Group" section on "Automatically Adding Members to a Group Based on Conditions".

Frequently Asked Questions

Q1) I cannot change the status or delete some users. The Entra ID log shows "500 Internal server error."
A1) This error occurs when an attempt is made to set a value that is not allowed. TrustLogin restricts users from setting the same value for both the email address and the secondary email address, so please set the Azure AD "mail" attribute to a value different from "userPrincipalName."

If you also want to configure SAML authentication for Microsoft 365, see the link below.↓

How to Configure Microsoft 365 (SAML Auto Configuration) – Support − TrustLogin byGMO [Formerly SKUID] (trustlogin.com)


If you want to remove the integration, see the link below.↓
How to Remove SCIM IdP Integration

How to Configure SCIM IdP Integration (Microsoft Entra Connect)

[Reduce ID Management Effort by Integrating Entra ID with TrustLogin]


"SCIM IdP Integration" is a feature that synchronizes identity information using the SCIM protocol.
This article explains how to configure SCIM IdP Integration to connect with Microsoft Entra ID.
Note: This feature allows customers using Microsoft Entra Connect to synchronize users from Microsoft Entra ID
to TrustLogin.
Note: To use this feature, you need to subscribe to the TrustLogin Pro Plan or the corresponding option. For pricing, click here

TrustLogin Configuration

  1. Log in to TrustLogin, open the "Admin Page > Settings > Optional Features" menu, and open "Settings" to the right of "SCIM IdP Integration."
    image01.png

  2. Open "Add SCIM Source Configuration."
    image02.png

  3. Enter any name you like and click "Register."
    image3.png

  4. Open the source configuration you just created.
    image4.png

  5. Make a note of the values obtained from the "SCIM Endpoint" and "Generate Credentials" fields.
    (These will be used when configuring Entra ID.)
    Note: If you generate new credentials, the existing credentials will no longer be usable.
    image5.png

Azure AD Configuration

Configuring "Enterprise Applications"

  1. Open "Enterprise applications" from the Entra ID admin center.
    The Entra ID admin center can be accessed here.


  2. Select "New application."


  3. Select "Create your own application."


  4. Enter any name you like and click "Create."


  5. Open the "Provisioning" screen and click "New configuration" or "Get started."


  6. Enter the "SCIM configuration endpoint" obtained in step 5 of the TrustLogin configuration into "Tenant URL," and enter the value obtained from "Generate Credentials" into "Secret Token."


  7. Click "Test Connection" and confirm that the connection test completes successfully. Once confirmed, click "Create."


  8. In the mapping section, select "Provision Microsoft Entra ID Users."


  9. Select "Add New Mapping."


  10. Add companyName to the attribute mapping. Set "Source attribute" to "companyName"
    and "Target attribute" to "
    urn:ietf:params:scim:schemas:extension:enterprise:2.0:User:organization," then click OK.


  11. Add immutableid to the attribute mapping.
    Select "Add New Mapping" again, set "Source attribute" to "immutableId,"
    and "Target attribute" to "emails[type eq "other"].value," then click "OK."

  12. Save the settings.


    [Note] The attribute values imported from Entra ID to TL are as follows:

    AzureAD AzureAD Attribute AzureAD customappsso Attribute TrustLogin
    Username/Email userPrincipalName userName Email Address
    Display Name displayName displayName -
    Job Title jobTitle title -
    First Name givenName name.givenName First Name
    Last Name surname name.familyName Last Name
    Street Address streetAddress addresses[type eq "work"].streetAddress Street Address
    City city addresses[type eq "work"].locality City
    State/Prefecture state addresses[type eq "work"].region State/Prefecture
    Postal Code postalCode addresses[type eq "work"].postalCode Postal Code
    Country/Region country addresses[type eq "work"].country -
    Company Phone telephoneNumber phoneNumbers[type eq "work"].value Phone Number
    Mobile Phone mobile phoneNumbers[type eq "mobile"].value -
    Fax Number facsimileTelephoneNumber phoneNumbers[type eq "fax"].value -
    Company companyName urn:ietf:params:scim:schemas:extension:enterprise:2.0:User:organization Company Name
    Department department urn:ietf:params:scim:schemas:extension:enterprise:2.0:User:department Department

    immutableID

    Hidden in UI

    immutableId emails[type eq "other"].value Custom attribute: immutableID

    Email

    mail
    emails[type eq "work"].value
    Secondary Email Address
    External ID objectId
    externalId
    -
  13. Open the "Provisioning" settings.


  14. In the mapping section, select "Provision Microsoft Entra ID Groups."


  15. Change the "Enabled" setting to "No" and save.


  16. Open the "Provisioning" settings.


Change the "Scope" under "Settings" to match the scope you want to synchronize.
If you want to synchronize only specific users or groups, select "Sync only assigned users and groups."
If you want to synchronize all users under Entra ID, select "Sync all users and groups."


Configuring "User Provisioning"

  1. Provision users.
    Open "Users and groups" and select "Add user/group."


  2. Select "None Selected" and choose the users you want to synchronize (or the group to which those users belong).


  3. Click "Assign."


  4. Open "Provisioning" and click "Start provisioning" to begin synchronization with TrustLogin.

    A message indicating that provisioning has started will be displayed.


  5. You can check the results of user provisioning from the "Provisioning logs." Users for whom the "Create" action shows "Success" in the log will be created in TrustLogin.


  6. The configuration is now complete.
    Because the management of TrustLogin members created through Entra ID SCIM Integration depends on Entra ID, the following member operations cannot be performed on the TrustLogin side:

    - Profile changes
    - Member status changes
    - Member deletion
    mceclip1.png

Currently, only users are provisioned; groups are not provisioned. For information about group assignment, see the "Register a Group" section on "Automatically Adding Members to a Group Based on Conditions".

Frequently Asked Questions

Q1) I cannot change the status or delete some users. The Entra ID log shows "500 Internal server error."
A1) This error occurs when an attempt is made to set a value that is not allowed. TrustLogin restricts users from setting the same value for both the email address and the secondary email address, so please set the Azure AD "mail" attribute to a value different from "userPrincipalName."

If you also want to configure SAML authentication for Microsoft 365, see the link below.↓

How to Configure Microsoft 365 (SAML Auto Configuration) – Support − TrustLogin byGMO [Formerly SKUID] (trustlogin.com)


If you want to remove the integration, see the link below.↓
How to Remove SCIM IdP Integration