How to Configure SAML Authentication for Prisma Access

Item

Details

Prerequisites

  • Prior setup in Prisma Access is required.

  • For the latest configuration steps, please refer to the manual provided by Prisma Access.

Name ID

Email address


Custom attribute Note: For instructions on how to configure custom attributes, see here

SP-side Settings

Configured by the administrator


Request configuration from the SP

Provisioning


API-based provisioning support (accounts can be managed via TrustLogin)


SAML JITprovisioning support (accounts can be managed via TrustLogin; user deletion not supported)

None (accounts created in each system)

Access Method

SP-Initiated SSO


IdP-Initiated SSO

Verified Operation Status by Device

PC - Browser

PC - Desktop App


iOS - Standard Browser (Safari)


iOS - TrustLogin Mobile App Internal Browser

iOS - Native App


Android - Standard Browser (Chrome)


Android - TrustLogin Mobile App Internal Browser

Android - Native App


Obtain SAML Configuration Information from Prisma Access

Obtain the following information from Prisma Access.
Note: Since Prisma Access has two SPs, the GP Portal and the GP Gateway, you need to obtain the SAML information for each of them.

Entity ID

GP Portal
https://{GP Portal FQDN}:443/SAML20/SP

GP Gateway
https://{GP Gateway FQDN}:443/SAML20/SP

ACS URL to Service

GP Portal
https://{GP Portal FQDN}:443/SAML20/SP/ACS

GP Gateway
https://{GP Gateway FQDN}:443/SAML20/SP/ACS

Logout URL

GP Portal
https://{GP Portal FQDN}:443/SAML20/SP/SLO

GP Gateway
https://{GP Gateway FQDN}:443/SAML20/SP/SLO

 
[How to Check the FQDN of the GP Portal and GP Gateway]

  1. Open the settings management screen (Panorama WebUI), and from the [PANORAMA] tab, select [Cloud Service]>[Status].
  2. [Network Details] tab, select [Mobile Users - GlobalProtect].
  3. Confirm the FQDN displayed on the Portal and Gateway.
    FQDN.png

TrustLogin Admin Page Settings

  1. [Register the SAML App for the GP Portal]
    Log in to TrustLogin, open the “Admin Page > Apps” menu, and click the “Register App” button in the upper right of the screen.
    01.png

  2. On the “Register Corporate App” screen, search for and select “Prisma Access (GP Portal) (SAML)”.
    02.png

  3. Download the metadata from “Download Metadata” under “Identity Provider Information”.
    03.png

  4. In the three blank fields under “Service Provider Settings,” enter the “GP Portal FQDN” obtained from Prisma Access.
    04.png

  5. Click the “Register” button to save.

  6. [Register the SAML App for the GP Gateway]
    Next, register the SAML app for the GP Gateway in the same way. Return to the “Admin Page > Apps” menu and click the “Register App” button in the upper right of the screen.
    01.png

  7. On the “Register Corporate App” screen, search for and select “Prisma Access (GP Gateway) (SAML)”.
    05.png

  8. Download the metadata from “Download Metadata” under “Identity Provider Information”.03.png

  9. In the three blank fields under “Service Provider Settings,” enter the “GP Gateway FQDN” obtained from Prisma Access. If there are multiple GP Gateway FQDNs, use the preferred FQDN for the Entity ID and Logout URL, and configure the ACS URL for each FQDN.
    Note: If there are three or more FQDNs, Register a Custom SAML App for instructions.
    06.png

  10. Click the “Register” button to save.


TrustLogin User Settings

① When a User Adds the App from My Page

  1. Click the “Add App” button on “My Page.”
  2. On the “Register App” screen, select “Prisma Access (GP Portal) (SAML)” and click the “Next” button in the upper right of the screen.
  3. If you want to change the “Display Name,” enter a new one, then click the “Register” button.
  4. Add “Prisma Access (GP Gateway) (SAML)” in the same way.

② When an Administrator Adds a Member

  1. In the “Admin Page > Apps” menu, search for and click the “Prisma Access (GP Portal) (SAML)” app.
  2. Click “Add Member,” select the user to add from the member list, then click the “Register” button to add them.
  3. Add “Prisma Access (GP Gateway) (SAML)” in the same way.


Prisma Access Settings

Add SAML IdP

  1. Open the settings management screen, and from the [DEVICE] tab, select the template: [Mobile_User_Template].
  2. [Server Profile]>[SAML Identity Provider], select this, then click [Import].
  3. SAML IdP import screen: enter a profile name (any name is fine), click [Browse...], then specify the metadata (xml file) obtained from TrustLogin, [Verify Identity Provider Certificate]: turn this off, then click [OK].
    07.png

  4. Click the profile name added in step 3 (GP Portal).

  5. SAML IdP server profile screen: change [Identity Provider SLO URL] to the following, then click [OK].
    https://portal.trustlogin.com/users/sign_out

    08.png

  6. [DEVICE] tab, select the template: [Mobile_User_Template].
  7. [Certificate Management]>[Certificates]: select this, then check the [Device Certificates] tab to confirm that a device certificate for GP Portal IdP has been created.(Name: crt.(GP Portal IdP Profile Name).shared)

    09.png

  8. Following the same steps, also add the SAML IdP for the GP Gateway.

Add Authentication Profile

  1. [DEVICE] tab, select the template: [Mobile_User_Template].
  2. [Authentication Profile]: select this, then click [Add].

    10.png
  3. On the Authentication Profile screen, enter a name; on the [Authentication] tab, set the Type to [SAML], and configure any other required information.

  4. [Advanced] tab: click [Add] in the Allow List and select “all”, then click [OK].

    11.png

  5. Following the same steps, also add the authentication profile for the GP Gateway.

Configure SAML Authentication (GP Portal)

  1. [NETWORK] tab, select the template: [Mobile_User_Template].
  2. [GlobalProtect] > [Portals]: select this, then click GP Portal (GlobalProtect_Portal).

    12.png

  3. GlobalProtect Portal settings screen: click the [Authentication] tab, then click [Add] under Client Authentication.
  4. On the Client Authentication screen, enter a name, select the authentication profile, then click [OK].

    13.png

  5. GlobalProtect Portal settings screen: take the SAML authentication setting created in step 4 on the previous page and click [Move Up], moving it to the top of Client Authentication.
    14.png

  6. GlobalProtect Portal settings screen: click the [Agent] tab: from the agent list, select “FENICS-DEFAULTthen click [Copy].

  7. On the [Authentication] tab of the settings screen, enter [Name], confirm that each Authentication Override setting is unchecked, then click [OK].

    15.png

  8. GlobalProtect Portal settings screen: take the SAML authentication agent setting created in step 7 on the previous page and click [Move Up], moving it to the top of the agent list, then click [OK].
    16.png

    • Note】GP Portal agent settings: for iOS SAML authentication, the GP Client’s connection method “Pre-logon” and “User-logon” are not supported.
    • iOS: create a dedicated agent setting separate from the common OS setting for iOS (iOS-specific)), and set GP Client’s connection method to “On-Demand.”iOS agent setting: when using this, be sure to move it, from the list of agent settings, above the “OS: any” agent setting.

      17.png
    • Note] Choosing the Web Browser for SAML AuthenticationFor SAML authentication performed by GlobalProtect, using the default browser is recommended.
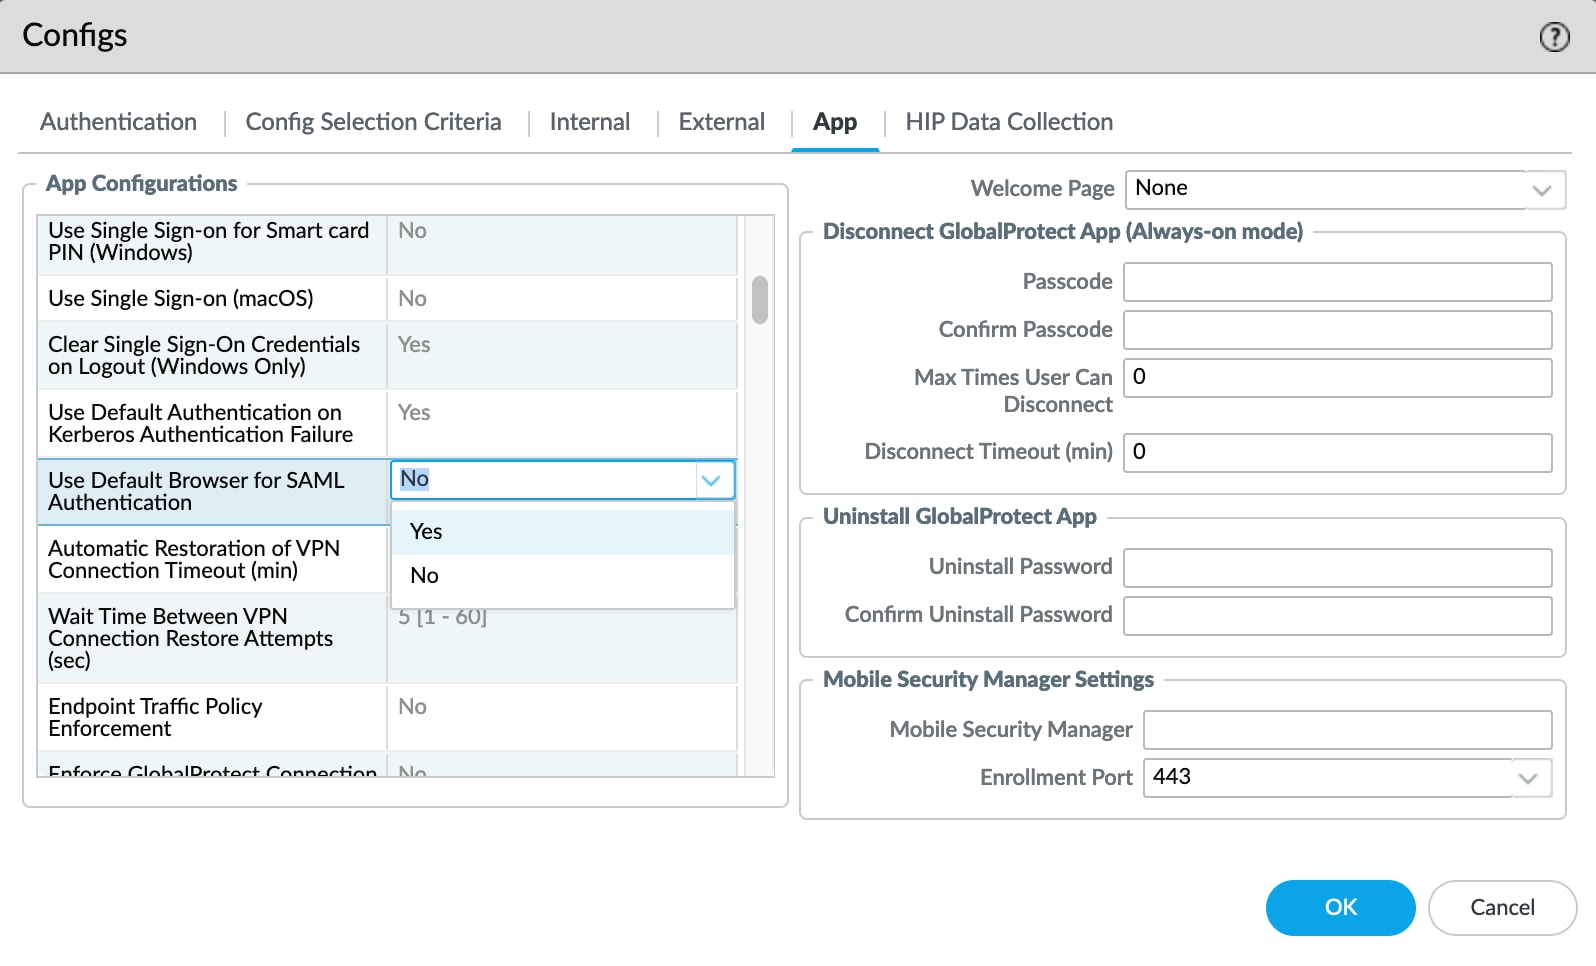
      Figure 2. App Configuration settings. Select 'Yes' or 'No' for 'Use Default Browser for SAML Authentication'
      It can be difficult to explicitly clear cookies retained by the built-in browser. As a result, if a valid session remains with the SAML IdP at the time of a second authentication, the connection may complete without going through the authentication screen. If you want to force the authentication screen to be displayed again, you will need to wait for the session to expire, restart the client, or delete the session on the SAML IdP side.
      For more information, please refer to the following.
      Note 1: Choosing the Web Browser for SAML Authentication (paloaltonetworks.com)

Configure SAML Authentication (GP Gateway)

  1. [NETWORK] tab, select the template: [Mobile_User_Template].
  2. [GlobalProtect] > [Gateways]: select this, then click GP Gateway (GlobalProtect_External_Gateway).

    18.png

  3. GlobalProtect Gateway settings screen: click the [Authentication] tab, then click [Add] under Client Authentication.
  4. On the Client Authentication screen, enter a name, select the authentication profile, then click [OK].

    19.png

  5. GlobalProtect Gateway settings screen: take the SAML authentication setting created in step 4 on the previous page and click [Move Up], moving it to the top of Client Authentication.
    20.png

  6. GlobalProtect Gateway settings screen: click the [Agent] tab, then on the [Client Configuration] tab, from the agent list, select “FENICS-DEFAULT” and click [Copy].

  7. On the [Configuration Selection Criteria] tab of the settings screen, enter [Name].

  8. On the [Authentication Override] tab of the settings screen, confirm that each setting is unchecked, then click [OK].
    21.png

  9. GlobalProtect Gateway settings screen: take the settings created in steps 7 and 8 on the previous page (the SAML authentication agent settings), and click [Move Up] to move them to the top of the agent list, then click [OK].
    22.png


How to Configure SAML Authentication for Prisma Access

Item

Details

Prerequisites

  • Prior setup in Prisma Access is required.

  • For the latest configuration steps, please refer to the manual provided by Prisma Access.

Name ID

Email address


Custom attribute Note: For instructions on how to configure custom attributes, see here

SP-side Settings

Configured by the administrator


Request configuration from the SP

Provisioning


API-based provisioning support (accounts can be managed via TrustLogin)


SAML JITprovisioning support (accounts can be managed via TrustLogin; user deletion not supported)

None (accounts created in each system)

Access Method

SP-Initiated SSO


IdP-Initiated SSO

Verified Operation Status by Device

PC - Browser

PC - Desktop App


iOS - Standard Browser (Safari)


iOS - TrustLogin Mobile App Internal Browser

iOS - Native App


Android - Standard Browser (Chrome)


Android - TrustLogin Mobile App Internal Browser

Android - Native App


Obtain SAML Configuration Information from Prisma Access

Obtain the following information from Prisma Access.
Note: Since Prisma Access has two SPs, the GP Portal and the GP Gateway, you need to obtain the SAML information for each of them.

Entity ID

GP Portal
https://{GP Portal FQDN}:443/SAML20/SP

GP Gateway
https://{GP Gateway FQDN}:443/SAML20/SP

ACS URL to Service

GP Portal
https://{GP Portal FQDN}:443/SAML20/SP/ACS

GP Gateway
https://{GP Gateway FQDN}:443/SAML20/SP/ACS

Logout URL

GP Portal
https://{GP Portal FQDN}:443/SAML20/SP/SLO

GP Gateway
https://{GP Gateway FQDN}:443/SAML20/SP/SLO

 
[How to Check the FQDN of the GP Portal and GP Gateway]

  1. Open the settings management screen (Panorama WebUI), and from the [PANORAMA] tab, select [Cloud Service]>[Status].
  2. [Network Details] tab, select [Mobile Users - GlobalProtect].
  3. Confirm the FQDN displayed on the Portal and Gateway.
    FQDN.png

TrustLogin Admin Page Settings

  1. [Register the SAML App for the GP Portal]
    Log in to TrustLogin, open the “Admin Page > Apps” menu, and click the “Register App” button in the upper right of the screen.
    01.png

  2. On the “Register Corporate App” screen, search for and select “Prisma Access (GP Portal) (SAML)”.
    02.png

  3. Download the metadata from “Download Metadata” under “Identity Provider Information”.
    03.png

  4. In the three blank fields under “Service Provider Settings,” enter the “GP Portal FQDN” obtained from Prisma Access.
    04.png

  5. Click the “Register” button to save.

  6. [Register the SAML App for the GP Gateway]
    Next, register the SAML app for the GP Gateway in the same way. Return to the “Admin Page > Apps” menu and click the “Register App” button in the upper right of the screen.
    01.png

  7. On the “Register Corporate App” screen, search for and select “Prisma Access (GP Gateway) (SAML)”.
    05.png

  8. Download the metadata from “Download Metadata” under “Identity Provider Information”.03.png

  9. In the three blank fields under “Service Provider Settings,” enter the “GP Gateway FQDN” obtained from Prisma Access. If there are multiple GP Gateway FQDNs, use the preferred FQDN for the Entity ID and Logout URL, and configure the ACS URL for each FQDN.
    Note: If there are three or more FQDNs, Register a Custom SAML App for instructions.
    06.png

  10. Click the “Register” button to save.


TrustLogin User Settings

① When a User Adds the App from My Page

  1. Click the “Add App” button on “My Page.”
  2. On the “Register App” screen, select “Prisma Access (GP Portal) (SAML)” and click the “Next” button in the upper right of the screen.
  3. If you want to change the “Display Name,” enter a new one, then click the “Register” button.
  4. Add “Prisma Access (GP Gateway) (SAML)” in the same way.

② When an Administrator Adds a Member

  1. In the “Admin Page > Apps” menu, search for and click the “Prisma Access (GP Portal) (SAML)” app.
  2. Click “Add Member,” select the user to add from the member list, then click the “Register” button to add them.
  3. Add “Prisma Access (GP Gateway) (SAML)” in the same way.


Prisma Access Settings

Add SAML IdP

  1. Open the settings management screen, and from the [DEVICE] tab, select the template: [Mobile_User_Template].
  2. [Server Profile]>[SAML Identity Provider], select this, then click [Import].
  3. SAML IdP import screen: enter a profile name (any name is fine), click [Browse...], then specify the metadata (xml file) obtained from TrustLogin, [Verify Identity Provider Certificate]: turn this off, then click [OK].
    07.png

  4. Click the profile name added in step 3 (GP Portal).

  5. SAML IdP server profile screen: change [Identity Provider SLO URL] to the following, then click [OK].
    https://portal.trustlogin.com/users/sign_out

    08.png

  6. [DEVICE] tab, select the template: [Mobile_User_Template].
  7. [Certificate Management]>[Certificates]: select this, then check the [Device Certificates] tab to confirm that a device certificate for GP Portal IdP has been created.(Name: crt.(GP Portal IdP Profile Name).shared)

    09.png

  8. Following the same steps, also add the SAML IdP for the GP Gateway.

Add Authentication Profile

  1. [DEVICE] tab, select the template: [Mobile_User_Template].
  2. [Authentication Profile]: select this, then click [Add].

    10.png
  3. On the Authentication Profile screen, enter a name; on the [Authentication] tab, set the Type to [SAML], and configure any other required information.

  4. [Advanced] tab: click [Add] in the Allow List and select “all”, then click [OK].

    11.png

  5. Following the same steps, also add the authentication profile for the GP Gateway.

Configure SAML Authentication (GP Portal)

  1. [NETWORK] tab, select the template: [Mobile_User_Template].
  2. [GlobalProtect] > [Portals]: select this, then click GP Portal (GlobalProtect_Portal).

    12.png

  3. GlobalProtect Portal settings screen: click the [Authentication] tab, then click [Add] under Client Authentication.
  4. On the Client Authentication screen, enter a name, select the authentication profile, then click [OK].

    13.png

  5. GlobalProtect Portal settings screen: take the SAML authentication setting created in step 4 on the previous page and click [Move Up], moving it to the top of Client Authentication.
    14.png

  6. GlobalProtect Portal settings screen: click the [Agent] tab: from the agent list, select “FENICS-DEFAULTthen click [Copy].

  7. On the [Authentication] tab of the settings screen, enter [Name], confirm that each Authentication Override setting is unchecked, then click [OK].

    15.png

  8. GlobalProtect Portal settings screen: take the SAML authentication agent setting created in step 7 on the previous page and click [Move Up], moving it to the top of the agent list, then click [OK].
    16.png

    • Note】GP Portal agent settings: for iOS SAML authentication, the GP Client’s connection method “Pre-logon” and “User-logon” are not supported.
    • iOS: create a dedicated agent setting separate from the common OS setting for iOS (iOS-specific)), and set GP Client’s connection method to “On-Demand.”iOS agent setting: when using this, be sure to move it, from the list of agent settings, above the “OS: any” agent setting.

      17.png
    • Note] Choosing the Web Browser for SAML AuthenticationFor SAML authentication performed by GlobalProtect, using the default browser is recommended.

      Figure 2. App Configuration settings. Select 'Yes' or 'No' for 'Use Default Browser for SAML Authentication'
      It can be difficult to explicitly clear cookies retained by the built-in browser. As a result, if a valid session remains with the SAML IdP at the time of a second authentication, the connection may complete without going through the authentication screen. If you want to force the authentication screen to be displayed again, you will need to wait for the session to expire, restart the client, or delete the session on the SAML IdP side.
      For more information, please refer to the following.
      Note 1: Choosing the Web Browser for SAML Authentication (paloaltonetworks.com)

Configure SAML Authentication (GP Gateway)

  1. [NETWORK] tab, select the template: [Mobile_User_Template].
  2. [GlobalProtect] > [Gateways]: select this, then click GP Gateway (GlobalProtect_External_Gateway).

    18.png

  3. GlobalProtect Gateway settings screen: click the [Authentication] tab, then click [Add] under Client Authentication.
  4. On the Client Authentication screen, enter a name, select the authentication profile, then click [OK].

    19.png

  5. GlobalProtect Gateway settings screen: take the SAML authentication setting created in step 4 on the previous page and click [Move Up], moving it to the top of Client Authentication.
    20.png

  6. GlobalProtect Gateway settings screen: click the [Agent] tab, then on the [Client Configuration] tab, from the agent list, select “FENICS-DEFAULT” and click [Copy].

  7. On the [Configuration Selection Criteria] tab of the settings screen, enter [Name].

  8. On the [Authentication Override] tab of the settings screen, confirm that each setting is unchecked, then click [OK].
    21.png

  9. GlobalProtect Gateway settings screen: take the settings created in steps 7 and 8 on the previous page (the SAML authentication agent settings), and click [Move Up] to move them to the top of the agent list, then click [OK].
    22.png